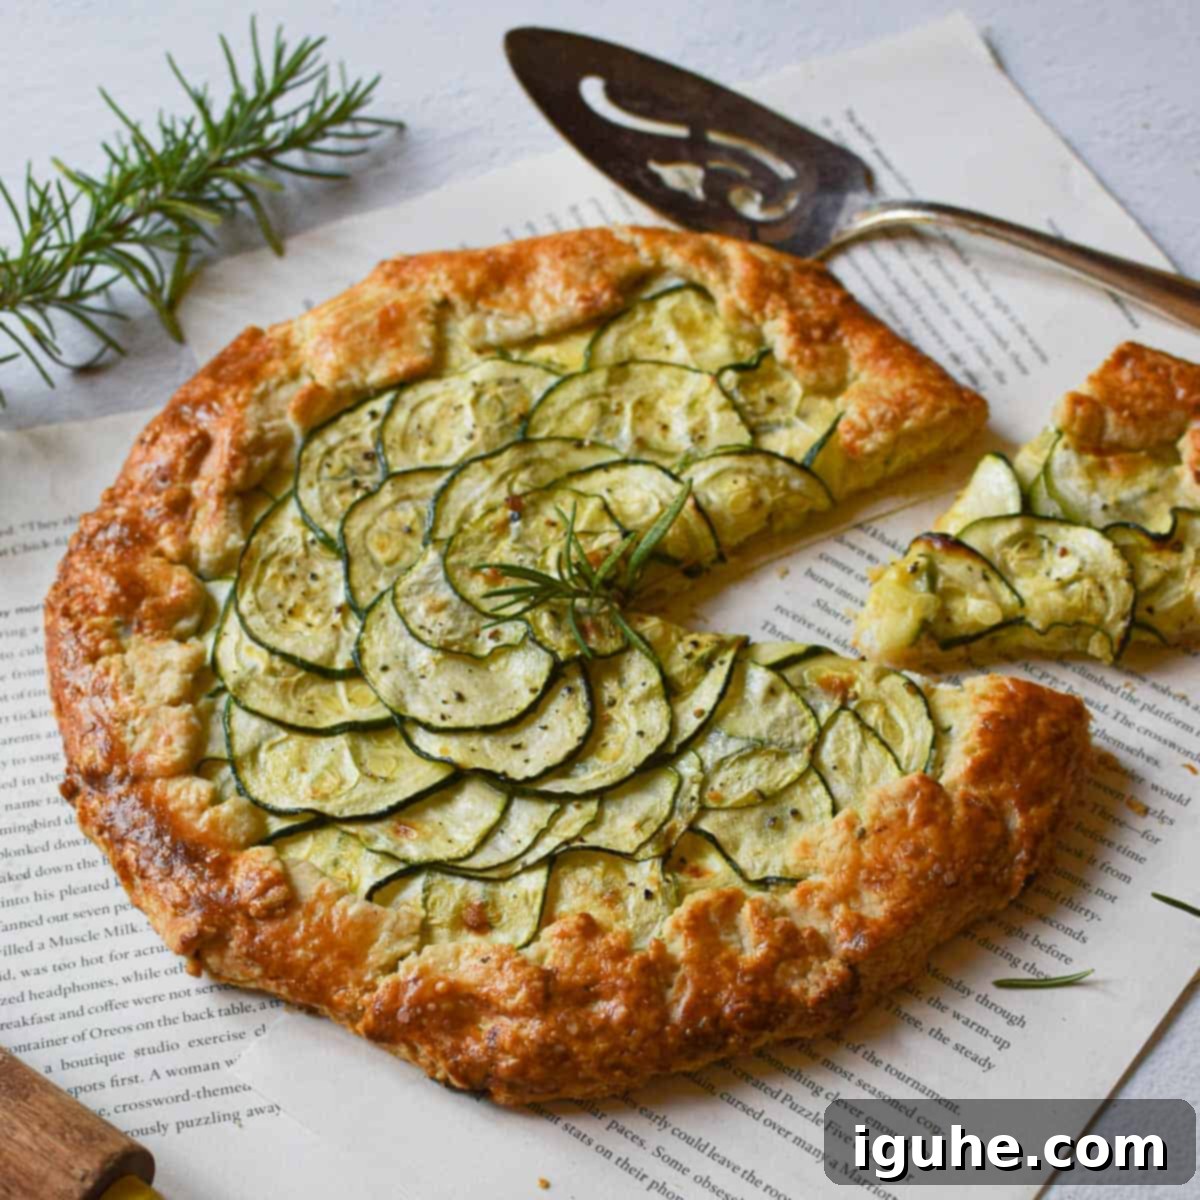
Effortlessly Elegant: Your Guide to a Perfect Zucchini and Ricotta Galette
Imagine a dish that’s both stunningly beautiful and wonderfully simple to create. This Zucchini and Ricotta Galette is exactly that – a true showstopper destined to impress at your next brunch, dinner party, or even a cozy weeknight meal. It features a rich, lemony ricotta cheese filling, generously topped with layers of tender, sweet zucchini, all encased in a miraculously flaky, golden-brown, and intensely buttery crust. While the idea of working with pie dough might seem daunting to some, galettes are the ultimate pastry hack. They are incredibly forgiving, embracing a rustic, free-form charm that makes them so much more fun and stress-free to prepare than a traditional pie.
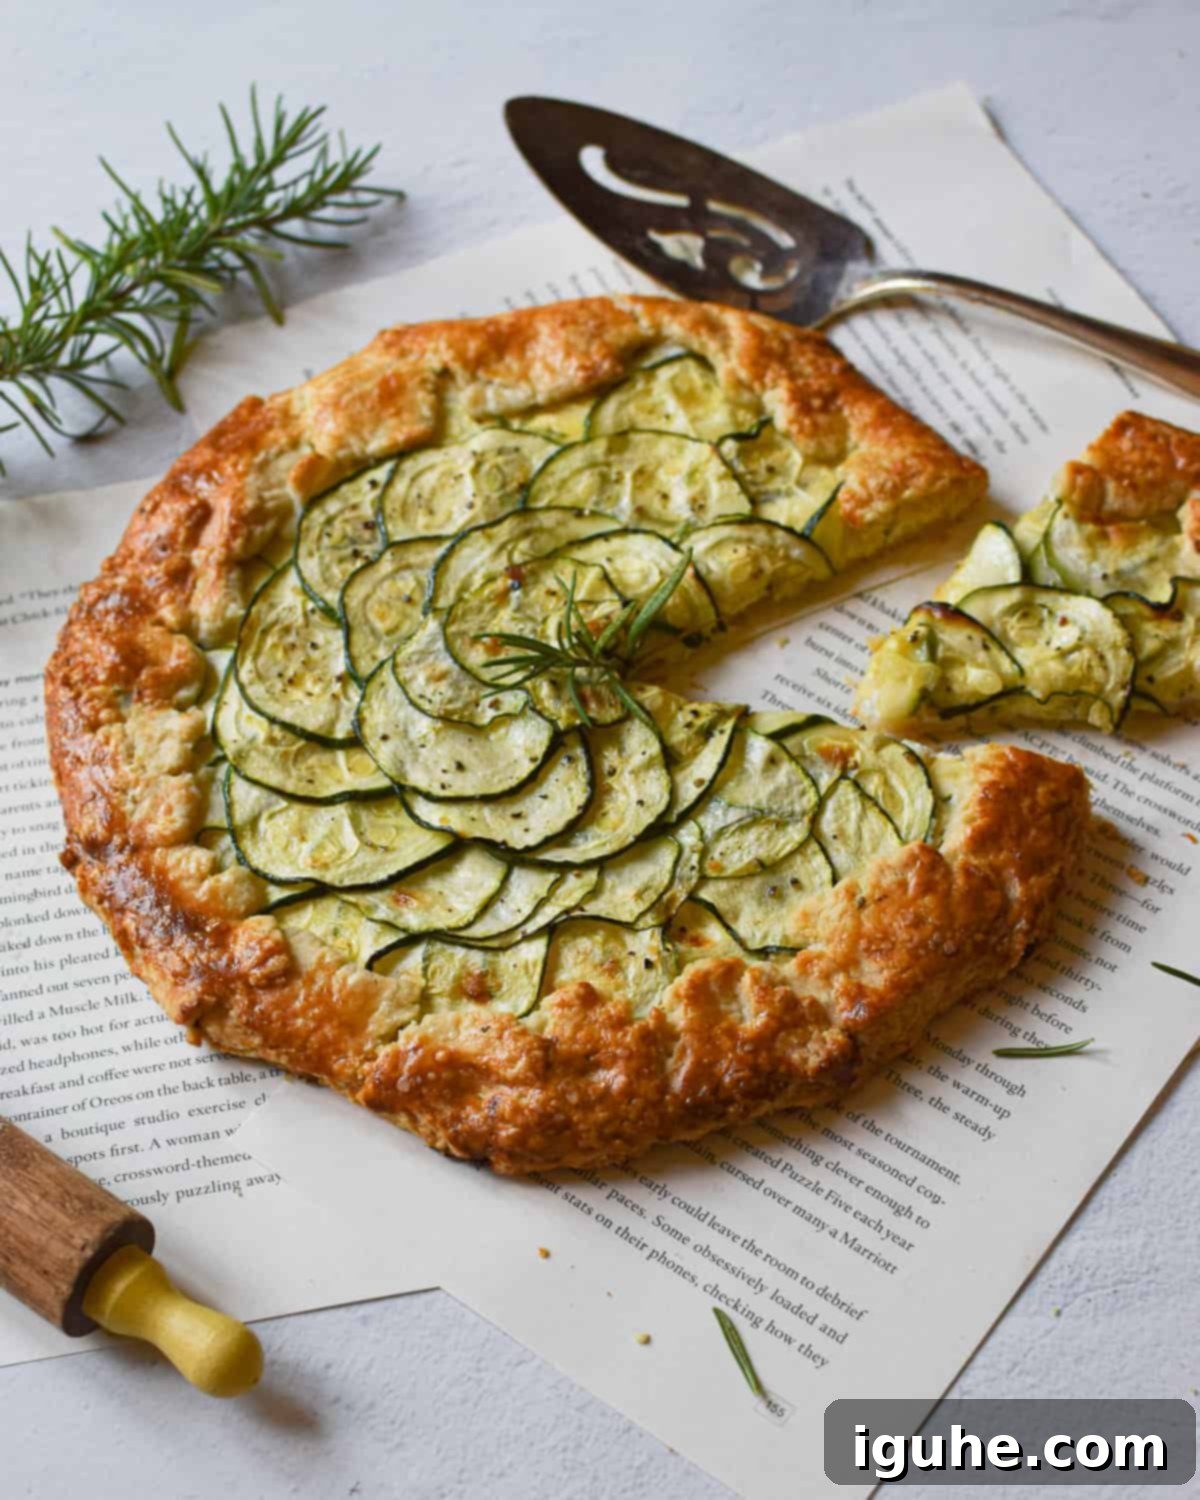
At its heart, this savory zucchini ricotta galette utilizes a straightforward, homemade pie crust. The beauty of this recipe lies in its ability to transform simple ingredients into a dish that looks both rustic and incredibly professional. One of my favorite time-saving tips is to prepare the pie dough in advance and freeze it. This way, whenever the craving for a fresh, warm galette strikes, or you need a quick yet elegant dish for guests, the hardest part is already done. Simply pull the dough from the freezer, let it thaw slightly, and you’re ready to assemble and bake!
What sets a galette apart from a traditional pie is its relaxed nature. There’s no need for meticulous crimping or striving for a perfectly uniform edge. With a galette, the charm is in the imperfection – you simply fold the dough over the filling, creating a beautiful, free-form tart that exudes homemade warmth. While this particular zucchini and ricotta galette is a delightful savory option, galettes can be sweet as well, showcasing their versatility. This combination of fresh zucchini and creamy ricotta is particularly exquisite, highlighting the very best flavors that summer farm stands have to offer. It’s an ideal way to enjoy the abundance of seasonal produce, transforming humble ingredients into something truly special.
Whether you’re new to baking or a seasoned pro, this recipe offers a rewarding experience with delicious results. Get ready to bake a stunning dish that tastes as good as it looks!
[feast_advanced_jump_to]
Key Ingredients for Your Zucchini Ricotta Galette
Crafting the perfect savory zucchini galette starts with understanding the role of each ingredient. Here’s a deeper dive into what you’ll need to create this delectable dish, from the buttery crust to the flavorful filling.
- Flour: The foundation of our flaky galette crust. All-purpose flour provides the necessary structure and tender texture. For best results, measure accurately to ensure the right consistency for a delicate pastry.
- Salt and Sugar: These are essential flavor enhancers for the crust. A pinch of salt balances the richness of the butter, while a touch of sugar adds a subtle sweetness that beautifully compliments the savory cheese filling. While the sugar is optional, I highly recommend including it as it creates a harmonious balance with the inherent saltiness of the ricotta and Pecorino Romano.
- Butter: This is the secret to a truly flaky and rich crust. The absolute key is to use very COLD unsalted butter, cut into small cubes. Cold butter creates pockets of steam during baking, which results in those desirable flaky layers. Ensure your butter is chilled right up until you’re ready to use it, and avoid overworking the dough, which can warm the butter prematurely.
- Egg Yolk Plus Water (Egg Wash): This simple mixture is brushed over the crust before baking. The egg wash is responsible for giving your galette that professional, perfectly shiny, and golden-brown finish, adding to its appetizing appearance. It also helps the crust crisp up beautifully.
- Zucchini: Fresh zucchini is paramount for this recipe. Zucchini is at its peak during the summer months, making this galette an ideal way to celebrate those vibrant farmer’s market finds. I typically use green zucchini for its classic flavor and appearance, but feel free to experiment with yellow squash or even a colorful mixture of both. Ensure your zucchini is firm and free of blemishes.
- Ricotta Cheese: This provides the creamy, luscious base for our filling. I prefer using whole milk ricotta for its rich texture and flavor, which contributes to a more decadent galette. However, if you’re looking for a lighter option, partial-skim ricotta can also be used effectively without compromising too much on creaminess. Make sure it’s well-drained to prevent a watery filling.
- Grated Cheese: This adds a sharp, salty depth to the ricotta filling. My personal favorite is Pecorino Romano for its distinctive pungent flavor, but Parmesan or Locatelli are excellent substitutes that will still deliver a wonderful savory note. Feel free to use your preferred hard, salty cheese.
- Lemon Zest: A burst of fresh lemon zest is crucial here. It brightens the entire filling, cutting through the richness of the cheese and adding an invigorating, aromatic lift that truly makes the flavors sing. Don’t skip this – it’s a game-changer!
- Rosemary: This earthy, aromatic herb pairs beautifully with zucchini and ricotta, infusing the filling with a sophisticated, woody flavor. Fresh rosemary is highly recommended for the best taste. If rosemary isn’t your preference or isn’t available, fresh basil, thyme, or chives are also fantastic choices that will offer different but equally delicious aromatic profiles.
- Salt and Pepper: Essential for seasoning the filling to taste. A good quality Kosher or sea salt and freshly ground black pepper will enhance all the other flavors, bringing out the best in the fresh produce and cheeses.
Crafting Your Zucchini Ricotta Galette: Detailed Instructions
Don’t be overwhelmed by the thought of making a galette from scratch! I’ve broken down the process into clear, manageable steps, complete with detailed explanations, so you can confidently create this rustic masterpiece just like a seasoned pro. The key is to take your time, enjoy the process, and embrace the charming imperfections of a homemade tart.
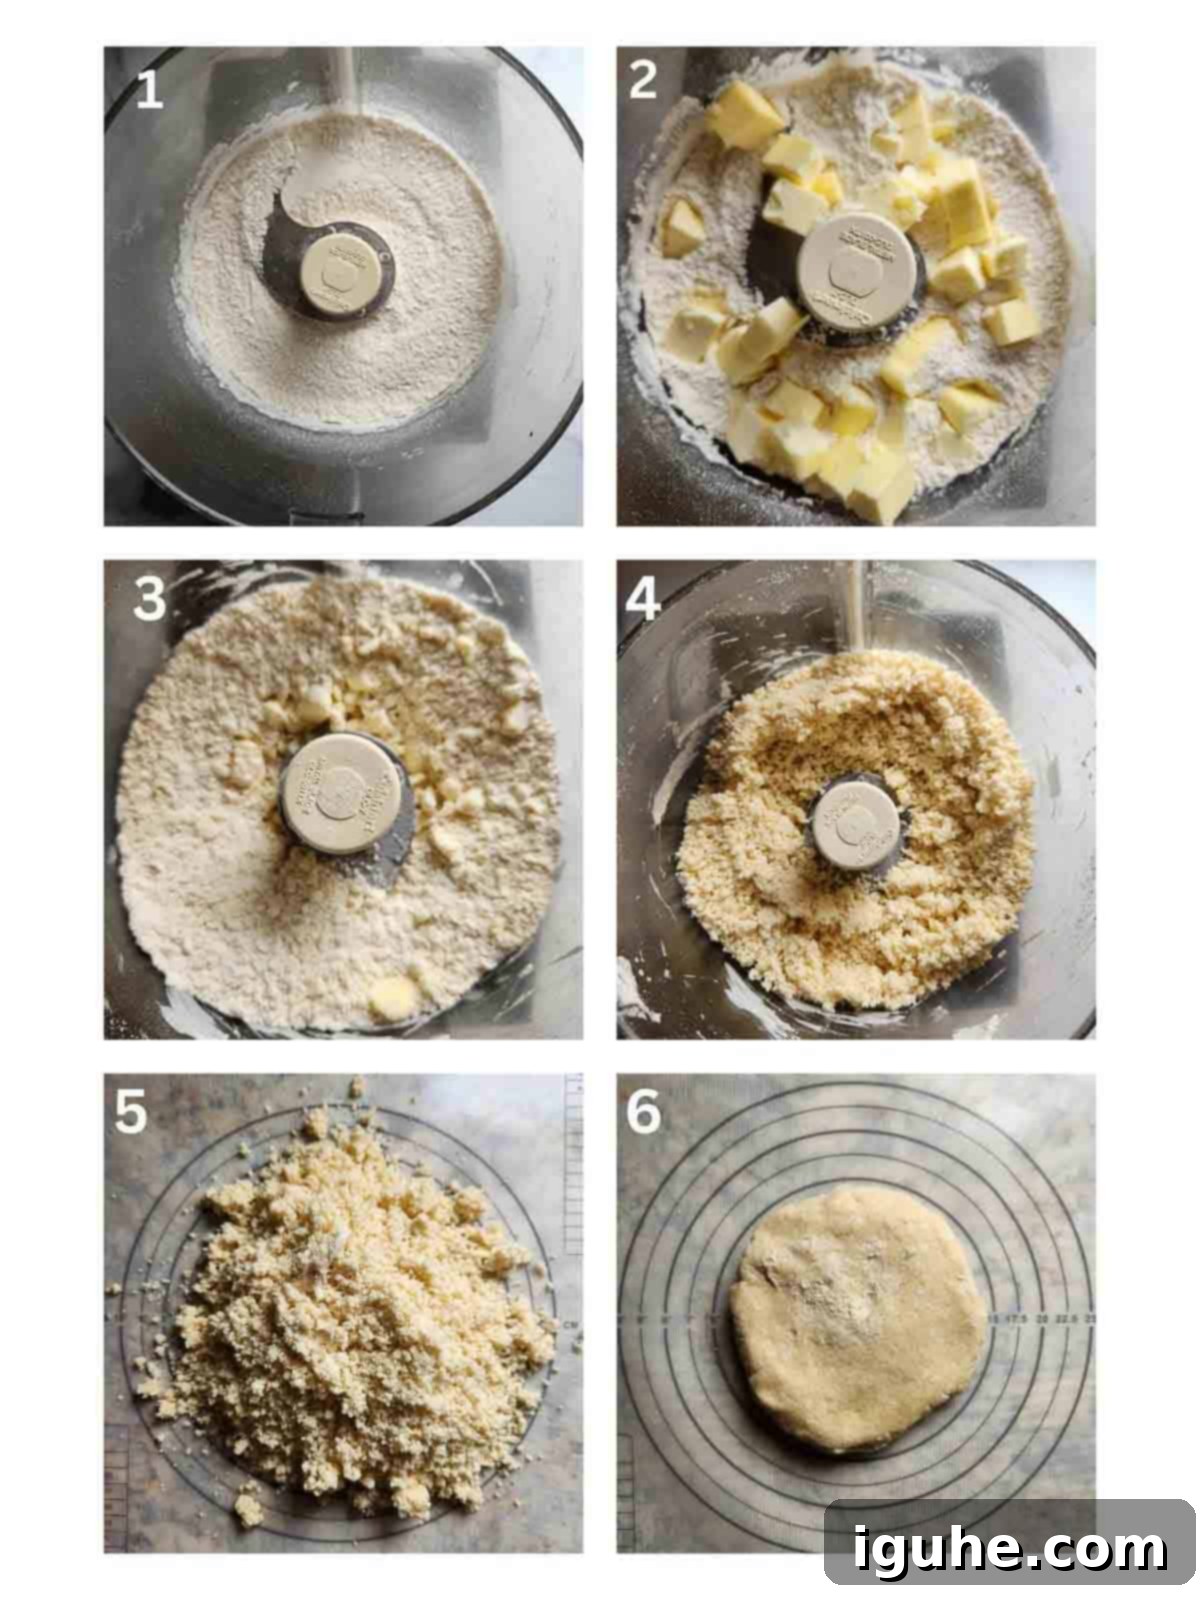
Step 1: Preparing the Dry Ingredients. Begin by adding your flour, salt, and sugar to a food processor. Pulse these dry ingredients a few times to ensure they are well combined and aerated. This initial step prevents pockets of unmixed ingredients in your final dough, contributing to an even texture. Step 2: Incorporating Cold Butter. Next, add the very cold, cubed unsalted butter to the food processor. Pulse another 5-6 times until the mixture resembles coarse crumbs, with some pea-sized pieces of butter still visible. These pockets of cold butter are absolutely crucial for creating a wonderfully flaky crust. Step 3: Adding Ice Water Gradually. With the food processor running, gradually add 3 tablespoons of ice water, pulsing a few times after each addition. The goal is to slowly bring the dough together without overworking it, which can lead to a tough crust. Step 4: Achieving the Right Dough Consistency. Continue adding ice water, one tablespoon at a time, until the mixture starts to come together and resembles wet sand. It won’t form a perfect ball in the processor, but it should hold together when you pinch it. Be careful not to add too much water, as this can make the crust tough; I usually need about 5 tablespoons total. Step 5: Forming the Dough Ball. Gently dump the crumbly dough mixture onto a clean, lightly floured surface. Use your hands to quickly gather and form it into a cohesive ball. Handle the dough as little as possible to keep the butter cold and prevent gluten from over-developing, ensuring flakiness. Step 6: Chilling the Dough. Flatten the dough ball into a disk shape, then wrap it tightly in plastic wrap. Place it in the refrigerator to chill for at least 15 minutes. This chilling period allows the gluten to relax and the butter to firm up, making the dough much easier to roll out later and ensuring a beautifully flaky crust.
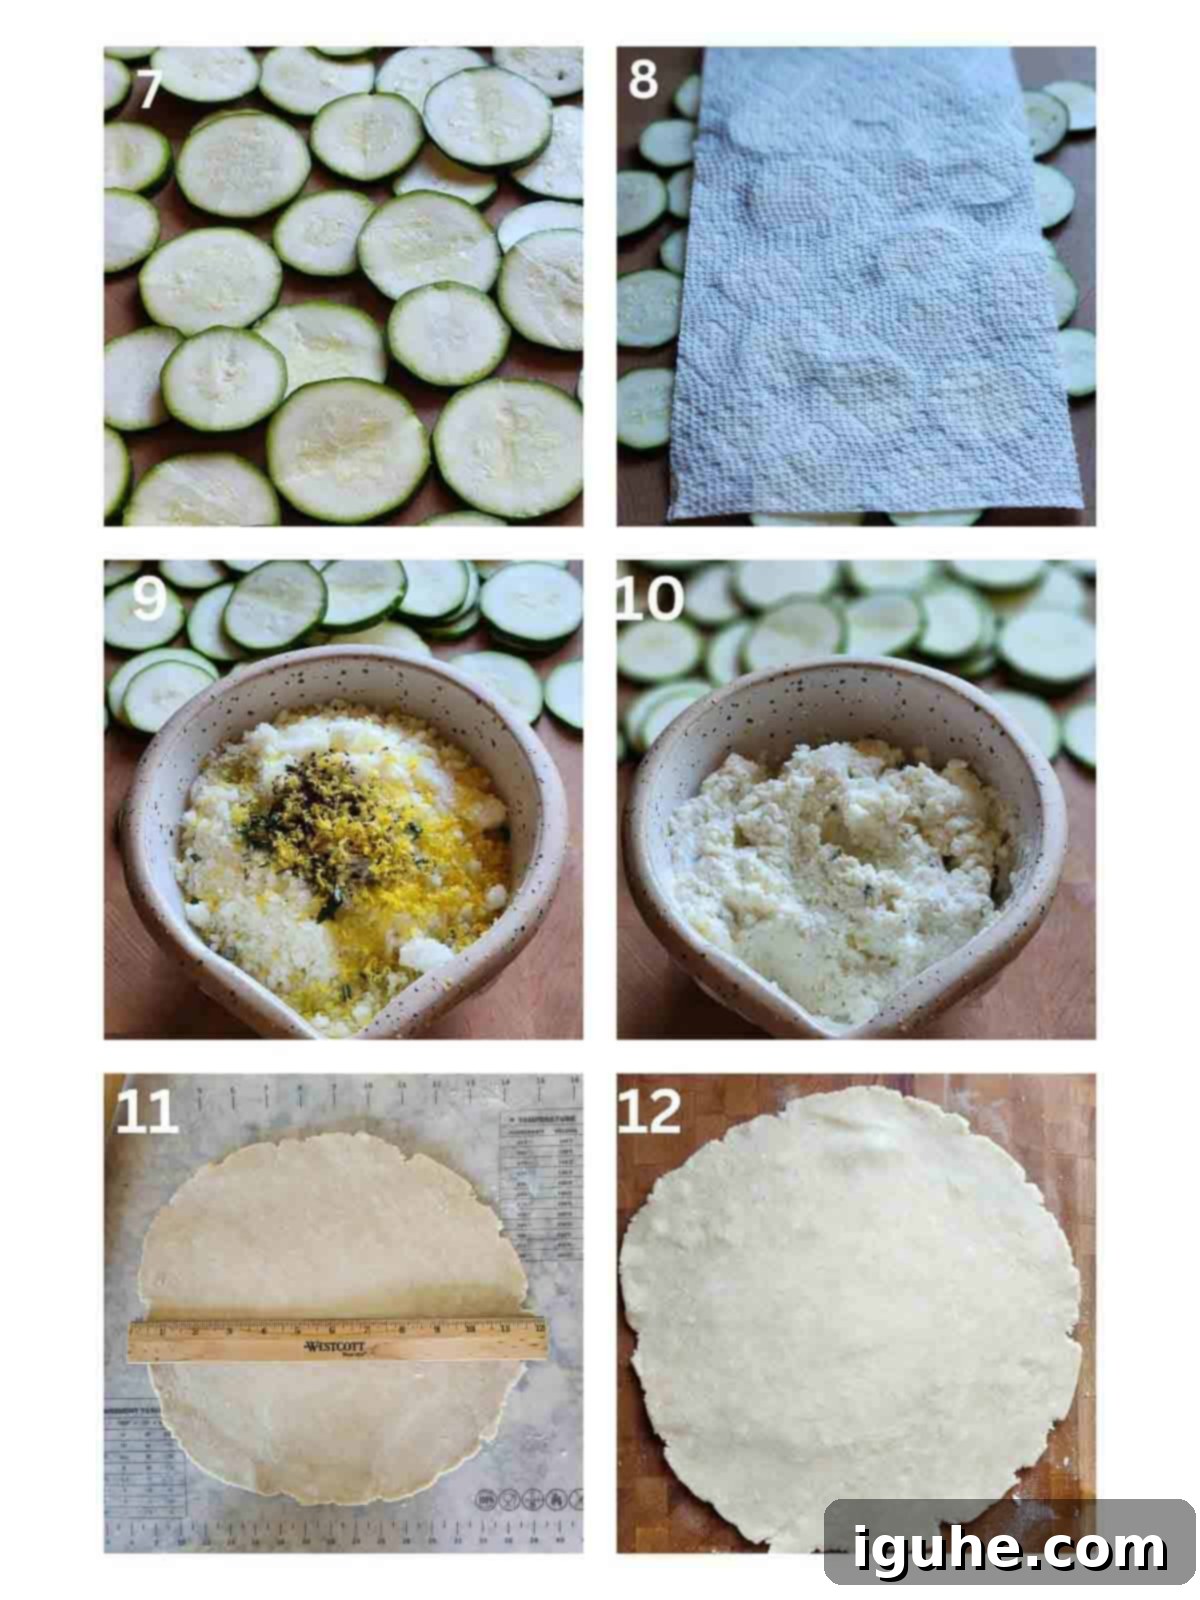
Step 7: Slicing the Zucchini. While your dough is chilling, prepare the star of the show: the zucchini. Slice the zucchini into thin, even rounds, ideally about ⅛ to ¼ inch thick. Uniform slices ensure even cooking and a beautiful presentation. A mandoline slicer is incredibly helpful for achieving consistent thickness, but a sharp knife works just as well with a steady hand. Step 8: Blotting Excess Moisture. Zucchini contains a lot of water, which can make your galette soggy if not addressed. After slicing, blot the zucchini rounds thoroughly with a paper towel, pressing down gently to absorb any excess moisture. This simple step is vital for a perfectly textured filling and a crispier result. Step 9: Preparing the Filling Mixture. In a medium-sized bowl, combine the ricotta cheese, grated Pecorino Romano (or your chosen cheese), 1 tablespoon of olive oil, finely chopped fresh rosemary, and bright lemon zest. Step 10: Mixing Until Combined. Mix all the filling ingredients until they are well combined and creamy. Season generously with salt and freshly ground black pepper to taste. Give it a quick taste test to adjust seasonings as needed – this is your chance to make the filling perfectly balanced! Step 11: Rolling Out the Dough. Once the dough is chilled, remove it from the refrigerator. On a lightly floured surface, use a rolling pin to roll out the dough disk into a roughly 12-inch diameter circle. Don’t worry if it’s not a perfect circle; remember, rustic is part of the galette’s charm and makes it uniquely yours! Step 12: Transferring the Dough. Carefully transfer the rolled-out dough to a baking sheet lined with parchment paper. Parchment paper is crucial here, as it prevents sticking and makes for easy cleanup and a smooth transfer of the baked galette.
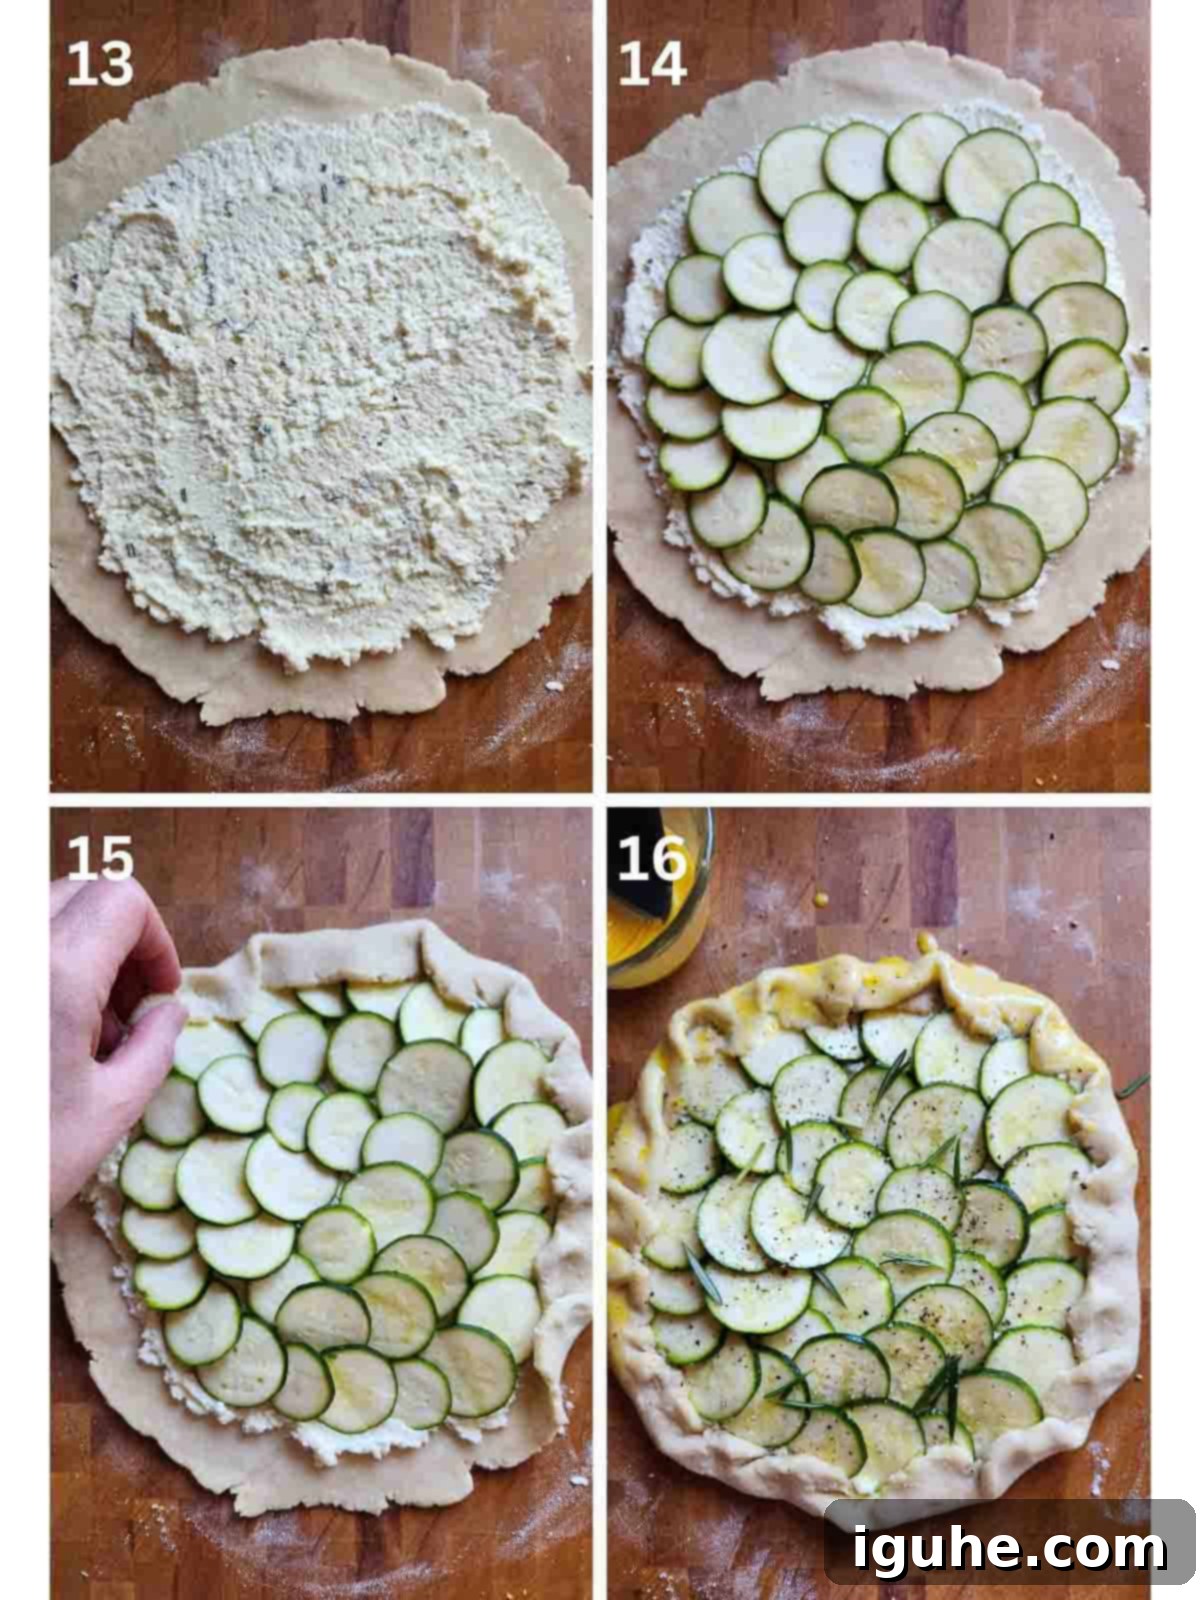
Step 13: Spreading the Ricotta Filling. Carefully spread the prepared ricotta mixture evenly over the rolled-out dough. Make sure to leave a generous border of about 1.5 inches around the entire edge of the dough. This un-filled border is essential for folding over to create the rustic crust and will help contain the creamy filling. Step 14: Arranging the Zucchini. Now, it’s time to artfully arrange your blotted zucchini slices over the ricotta filling. You can layer them in concentric circles, slightly overlapping each slice, to create a beautiful and organized presentation. This not only looks appealing but also ensures even distribution of the zucchini, allowing it to cook uniformly. Step 15: Folding the Galette Edges. This is where the “forgiving” nature of the galette shines! Using your fingers, gently fold the dough border up and over onto itself, pleating the edges as you work your way around the entire galette. Don’t strive for perfection; the rustic, uneven folds are part of its charm. Lightly tuck in the outer layer of zucchini as you fold, ensuring the filling is partially enclosed. Step 16: Finishing Touches and Egg Wash. Drizzle the remaining tablespoon of olive oil over the zucchini, then season with an extra sprinkle of salt, pepper, and fresh rosemary for an added aromatic touch. Finally, whisk together the egg yolk and 1 teaspoon of water to create an egg wash. Lightly brush this mixture over the exposed crust. This will give it that irresistible golden-brown color and beautiful sheen when baked, making your galette look as good as it tastes.
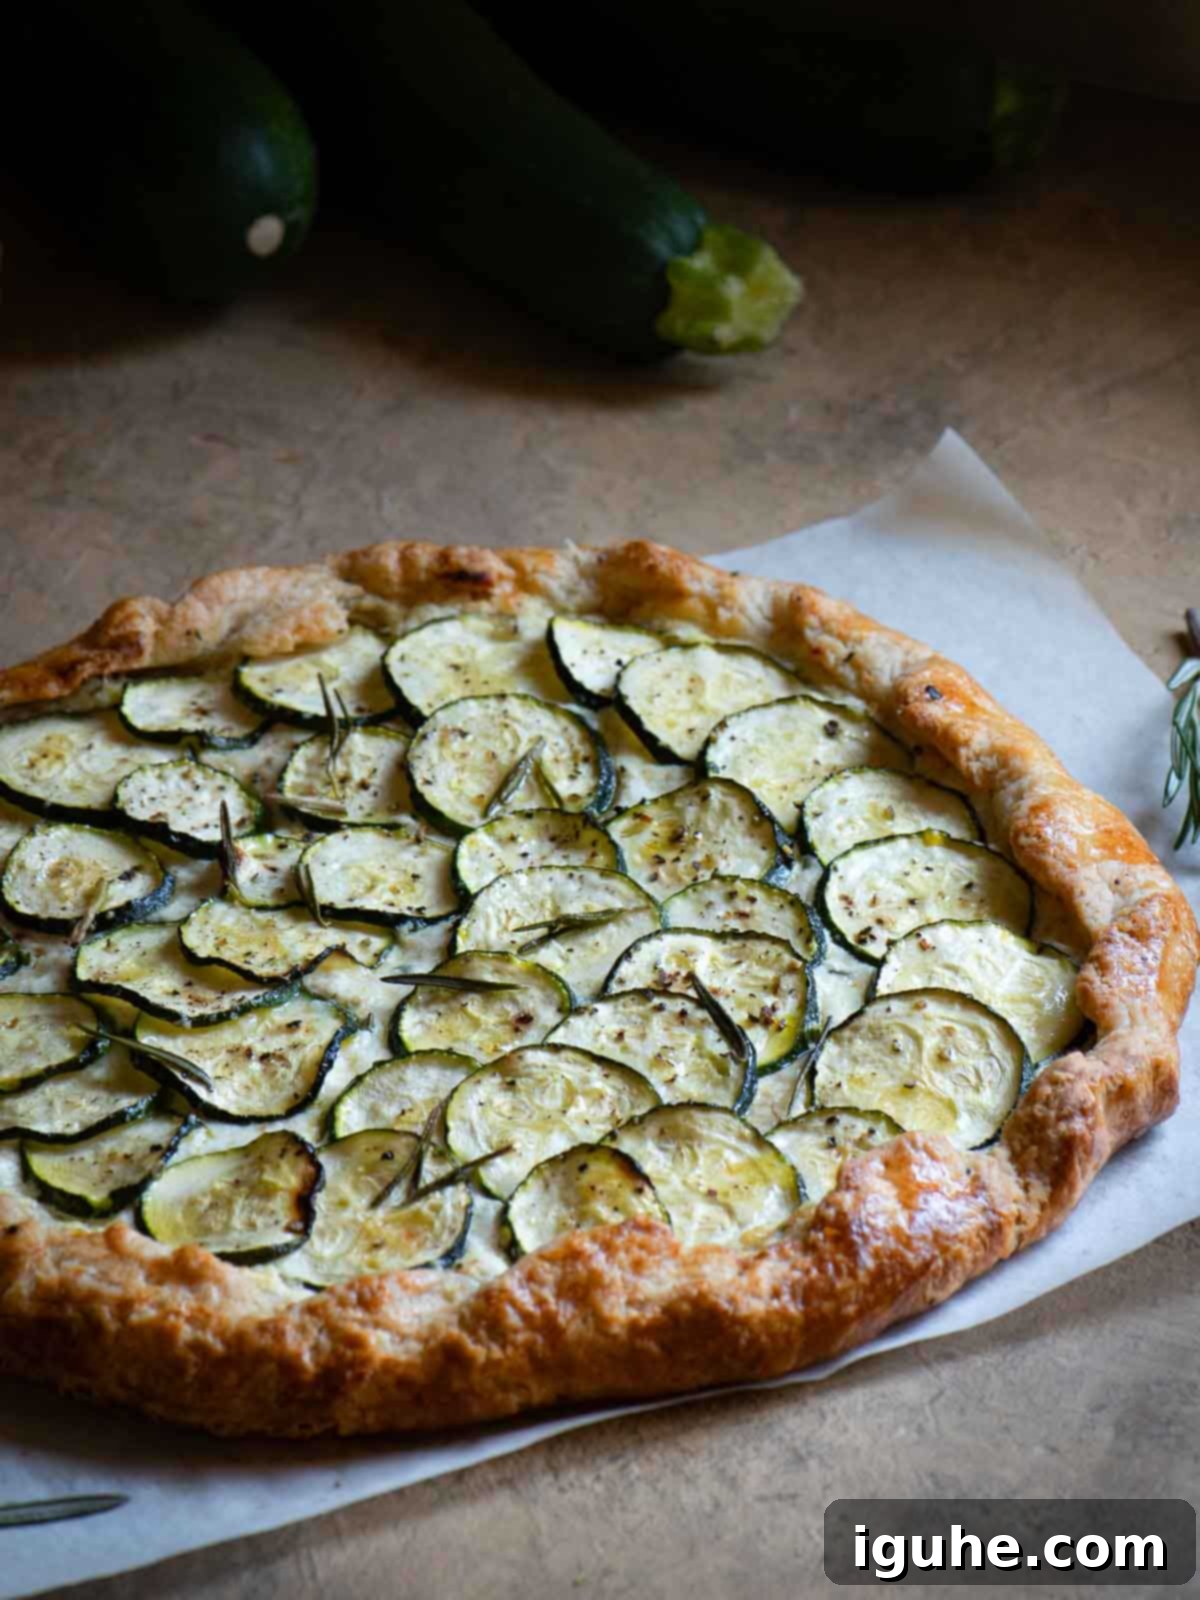
Preheat your oven to 400°F (200°C). Carefully transfer your prepared galette on its parchment-lined baking sheet to the preheated oven. Bake for approximately 30-40 minutes, or until the crust achieves a gorgeous golden-brown hue and the zucchini slices are tender and just beginning to caramelize and brown at the edges. Once baked, remove the galette from the oven and allow it to cool slightly on the baking sheet for about 5-10 minutes. This resting time helps the filling set and allows the flavors to meld beautifully. Slice into wedges and serve warm, allowing the delightful aromas to fill your kitchen.
👩🍳 Pro Tips for Galette Perfection
- Chill Your Dough Religiously. This isn’t just a suggestion; it’s a golden rule for flaky pastry! Ensuring your dough is thoroughly chilled in the refrigerator as instructed allows the gluten to relax, which prevents a tough crust. More importantly, it keeps the butter solid. When the cold butter hits the hot oven, it releases steam, creating those desired pockets of air that lead to a wonderfully flaky, tender crust. A well-chilled dough is also significantly easier to roll out without sticking or tearing, giving you more control over your pastry.
- Slice Zucchini Thin and Uniformly. The key to evenly cooked and beautifully presented zucchini in your galette is consistent slicing. Aim for very thin slices, ideally between ⅛ and ¼ inch thick. If slices are too thick, they won’t soften sufficiently during the baking time; if they’re too thin, they might disintegrate or become mushy. A mandoline slicer is a fantastic tool for achieving uniform thickness quickly and safely, but a sharp chef’s knife and careful technique will also yield excellent results. Alternatively, some food processors come with a slicing attachment that can be very efficient.
- Maintain a Clear Border. When spreading the ricotta filling, always remember to leave a distinct border of at least 1.5 inches around the entire edge of your dough. This un-filled space is crucial. It provides enough dough to fold over the filling, creating the rustic crust and, more practically, preventing any delicious filling from oozing out during baking, which could lead to a messy pan, burnt edges, and a less attractive galette.
- Embrace the Rustic Charm of the Fold. One of the most liberating aspects of making a galette is that perfection is *not* the goal for the crust fold. Unlike traditional pies that demand precise crimping, a galette celebrates a more natural, homemade aesthetic. Don’t stress about making every pleat identical or perfectly symmetrical. Simply gather the dough up and over the filling, creating a beautiful, free-form edge. The slightly imperfect, rustic look is part of its unique appeal and what makes it so charming – it tells a story of delicious, homemade goodness.
Delicious Variations and Creative Swaps
Feel like getting creative in the kitchen or adapting this recipe to suit your pantry and palate? This zucchini ricotta galette is incredibly versatile! Here are some fantastic swaps and additions you can try to mix things up and create your own signature version, ensuring you can enjoy this savory tart in many delicious forms.
- Cheese Swaps for the Filling:
- Goat Cheese: For a tangier, more robust flavor profile, replace some or all of the ricotta with fresh goat cheese. Its creamy texture and distinct taste offer a wonderful contrast to the sweet zucchini. For an irresistibly smooth and airy filling, you can process the goat cheese in a food processor first with a splash of milk or cream before adding the seasonings.
- Feta Cheese: Crumbled feta would add a salty, briny kick, complementing the zucchini beautifully and introducing a Mediterranean flair.
- Mozzarella or Provolone: For a milder, meltier cheese experience, try incorporating shredded mozzarella or provolone into the ricotta mixture. These options will create a more classic, comforting cheese flavor.
- Aromatic Additions:
- Garlic: For an extra layer of savory depth, finely minced fresh garlic can be added directly to the ricotta mixture. One to two cloves should be enough to infuse the filling with a lovely, fragrant aroma without overpowering it.
- Onions: Before adding the ricotta, consider spreading a thin layer of sweet caramelized onions over the dough. The deep, rich, umami flavor of caramelized onions pairs wonderfully with both zucchini and cheese, adding an incredible complexity and sweetness to the dish.
- Herb and Spice Experimentation: Beyond rosemary, try other fresh herbs that complement zucchini, such as basil (especially good with the lemon and a touch of mozzarella), fresh dill, or a mix of Italian herbs like oregano and thyme. A pinch of red pepper flakes can add a subtle, warming heat if you enjoy a little spice in your savory dishes.
- Added Protein & Richness: To elevate the dish and make it even more substantial, scatter crispy bits of prosciutto, pancetta, or crumbled bacon over the top of the zucchini before baking. The salty, savory crunch will be a delightful addition, adding texture and a richer flavor profile.
- Other Vegetables: While this is a zucchini galette, you can certainly experiment with other thinly sliced vegetables like cherry tomatoes (halved), asparagus spears, or colorful bell peppers, either alongside or in place of some of the zucchini. Ensure they are also blotted dry if they contain high water content to prevent a soggy crust.
Always remember to adjust salt and pepper according to your additions to ensure the flavors are perfectly balanced. For additional specific ingredient substitutions, please refer to the detailed ingredient section above for base recommendations.

Storage and Make-Ahead Tips for Convenience
One of the many advantages of this zucchini and ricotta galette recipe is its flexibility, especially when it comes to preparing components in advance. This makes it a fantastic option for entertaining or for simply enjoying fresh, homemade pastry without all the last-minute fuss, saving you precious time in the kitchen.
Make-Ahead Dough: The galette dough is perfectly suited for advance preparation. You can prepare the dough up until the point you would normally refrigerate it. After forming it into a disk, wrap it very tightly with several layers of plastic wrap, ensuring no air can get in, then place it in a heavy-duty freezer-safe bag. The dough can be frozen for up to 3 months without compromising its quality. When you’re ready to bake, simply transfer the frozen dough to the refrigerator the night before, or let it thaw on the counter for about an hour before rolling it out. This clever trick saves significant time and effort on baking day, allowing for a quicker assembly.
Storing Leftovers: If you happen to have any leftover slices of this delicious zucchini galette (which is unlikely, it’s so good!), they can be stored in an airtight container in the refrigerator for up to 3 days. To maintain its best texture and flavor, avoid leaving it at room temperature for extended periods, especially with the fresh ricotta filling.
Reheating Instructions: To reheat individual slices or the entire leftover galette, place it in a preheated oven at 350°F (175°C) until it is warmed through and the crust regains some of its crispness, typically about 10-15 minutes for a slice. This gentle reheating method helps to prevent the crust from becoming soggy. Microwaving is an option for quick reheating, but it may result in a softer crust, so for the best texture, the oven is always recommended.
Delightful Serving Suggestions
This savory Zucchini and Ricotta Galette is incredibly versatile and can be enjoyed in many ways, making it perfect for various occasions throughout the day. Its beautiful presentation and delightful flavors make it a crowd-pleaser.
- For Brunch: Elevate your brunch spread by pairing a warm slice of this galette with a fresh seasonal fruit salad, a vibrant mimosa, or a light green salad with a zesty vinaigrette dressing. The savory notes of the galette beautifully complement the sweetness of fruit and the crisp freshness of greens.
- As a Light Lunch or Dinner: Serve the galette as the star of a light meal alongside a vibrant mixed greens salad tossed with a lemon-herb dressing. A simple side of roasted cherry tomatoes, a bowl of homemade creamy tomato soup, or a light vegetable broth would also make a delightful and satisfying meal.
- As an Elegant Appetizer: For your next gathering, cut the galette into smaller squares or triangles and serve them warm or at room temperature. It’s perfect for sharing, easy for guests to pick up, and visually impressive on any appetizer platter.
- Picnic Perfect: This galette tastes wonderful at room temperature, making it an excellent and sophisticated addition to a picnic basket or packed lunch. Its sturdy crust holds up well during transport, making it an ideal outdoor dining option.
- Enhance the Flavors: For an extra flourish of flavor and visual appeal, garnish your freshly baked galette with additional fresh rosemary sprigs, a sprinkle of flaky sea salt, or a final grating of high-quality Parmesan or Pecorino Romano cheese just before serving. A drizzle of high-quality extra virgin olive oil can also add a luxurious sheen and depth of flavor.
Frequently Asked Questions About Zucchini Galette
Unlike some recipes, such as my zucchini pancake recipe where squeezing out excess moisture is crucial for batter consistency, you generally do not need to aggressively squeeze water out of the zucchini for this galette. However, it is very important to blot the zucchini slices thoroughly with a paper towel. Gently pressing down on the slices will absorb any surface moisture, which helps prevent the galette from becoming soggy and ensures the zucchini browns nicely during baking. This step is a good balance, removing enough moisture without making the zucchini overly dry and flavorless.
Absolutely! While a homemade crust elevates the flavor and texture significantly, using a store-bought, pre-made pie crust or puff pastry sheet is a fantastic shortcut if you’re short on time or new to pastry making. Simply roll out the pre-made dough to your desired thickness (roughly 12 inches in diameter) and proceed with the filling and folding instructions as outlined in the recipe. This will still yield a delicious and impressive galette with minimal effort, making it accessible for all skill levels.
No food processor? No problem at all! You can easily make the galette dough by hand using traditional methods. In a large bowl, whisk together the flour, sugar, and salt. Then, using a pastry blender, two knives, or even your fingertips, cut the cold, cubed butter into the flour mixture until it resembles coarse crumbs and some pea-sized pieces of butter remain. Gradually add the ice water, mixing with a fork or your hands until a shaggy dough forms. Proceed with forming a disk and chilling as instructed. The key is to work quickly and avoid overworking the dough to keep the butter cold and ensure a flaky crust.
More Delightful Squash Recipes to Explore
If you love the fresh, versatile flavors of squash and savory tarts, be sure to check out these other fantastic recipes from my kitchen. They are perfect for using up seasonal produce and adding variety to your meal rotation, whether you’re looking for breakfast, lunch, or dinner inspiration.
- Parmesan Zucchini Pancakes
- Crustless Zucchini Pie
- Zucchini Muffins With Applesauce
- Roasted Butternut Squash, Spinach, and Ricotta Frittata
Did you make this recipe? I would love to hear about it! Please leave a ⭐⭐⭐⭐⭐ rating with a comment right below the recipe card. Your feedback truly helps me and other home bakers! If you snap a photo of your creation, don’t forget to tag me on Instagram @brunchandbatter and use the hashtag #brunchandbatter so I can see your wonderful creations.
📖 Recipe Card: Zucchini and Ricotta Galette
Zucchini and Ricotta Galette
Pin Recipe
Equipment
-
food processor
Ingredients
For the galette crust:
- 1¼ cup all-purpose flour
- 1 tablespoon sugar
- ¼ teaspoon Kosher or fine sea salt
- ½ cup unsalted butter, cold and cut into cubes
- 3 tablespoon ice water, more if needed
- 1 egg yolk plus 1 teaspoon water for an egg wash
For the filling:
- 1 large (about 9 ounces) zucchini, sliced into thin rounds (about ⅛-¼ inch thick), and patted dry with a paper towel about 2 cups sliced zucchini
- ¾ cup ricotta cheese
- ½ cup grated pecorino romano cheese
- 2 tablespoon olive oil, divided
- ¾ tablespoon chopped fresh rosemary
- 2 teaspoon lemon zest
- ½ teaspoon Kosher or fine sea salt, plus more to taste
- ½ tsp fresh ground black pepper, plus more to taste
Instructions
Make the crust:
-
In a food processor, combine the all-purpose flour, sugar, and Kosher or fine sea salt. Pulse these dry ingredients a few times to ensure they are well blended. Add the very cold, cubed unsalted butter and pulse 5-6 more times until the mixture resembles coarse crumbs, with some small, pea-sized pieces of butter still visible.1¼ cup all-purpose flour, ¼ teaspoon Kosher or fine sea salt, ½ cup unsalted butter, cold and cut into cubes, 1 tablespoon sugar
-
Gradually add 3 tablespoons of ice water to the food processor, pulsing briefly after each addition. Continue to add more ice water, one tablespoon at a time, until the mixture transforms into a crumbly dough that resembles wet sand. The dough should hold together when pinched between your fingers but will not form a solid ball on its own (you will likely need about 5 tablespoons of water in total, but adjust as needed).3 tablespoon ice water, more if needed
-
Gently turn the dough mixture out onto a lightly floured surface. Use your hands to quickly gather the dough and form it into a cohesive ball. Then, flatten this ball into a disk shape. Wrap the disk tightly in plastic wrap and place it in the refrigerator to chill for approximately 15 minutes. This chilling period is crucial for firming up the butter and relaxing the gluten, making the dough easier to roll. While the crust is chilling, you can begin preparing your delicious filling.
Assembling the galette
-
Preheat your oven to 400°F (200°C). Prepare a large baking sheet by lining it with parchment paper. This will prevent sticking and make cleanup a breeze.
-
In a mixing bowl, combine the ricotta cheese, grated Pecorino Romano cheese (or chosen alternative), 1 tablespoon of the olive oil, chopped fresh rosemary, bright lemon zest, ½ teaspoon of Kosher or fine sea salt, and ½ teaspoon of fresh ground black pepper. Mix all ingredients thoroughly until well combined and creamy. Taste and adjust seasonings as desired. Set this flavorful filling aside.¾ cup ricotta cheese, ½ cup grated pecorino romano cheese, 2 tablespoon olive oil, divided, ¾ tablespoon chopped fresh rosemary, 2 teaspoon lemon zest, ½ teaspoon Kosher or fine sea salt, plus more to taste, ½ teaspoon fresh ground black pepper, plus more to taste
-
Remove the chilled dough disk from the refrigerator. On a lightly floured surface, roll out the dough using a rolling pin until it forms a circle approximately 12 inches in diameter. Don’t worry about achieving a perfect circle; a rustic shape adds to the galette’s charm.
-
Carefully transfer the rolled dough to your parchment-lined baking sheet. Spread the ricotta mixture evenly over the center of the dough, making sure to leave an approximate 1½-inch border around the entire edge of the dough. Use the back of a spoon or an offset spatula to distribute the filling smoothly.
-
Next, artfully arrange your thinly sliced and well-blotted zucchini rounds over the ricotta filling. For a visually appealing presentation, you can overlap the zucchini slices in concentric circles, starting from the outer edge of the filling and working your way inwards. Ensure the filling is well covered.1 large (about 9 ounces) zucchini, sliced into thin rounds (about ⅛-¼ inch thick), and patted dry with a paper towel
-
Now for the signature galette fold! Gently fold the dough border up and over onto itself, working your way around the entire circumference of the galette. As you fold, create small pleats in the dough. Remember, this is meant to look rustic and homemade, so there’s absolutely no need for perfect symmetry or precision. Lightly tuck the outer layer of zucchini slices under the folded dough as you go.
-
Drizzle the remaining tablespoon of olive oil evenly over the arranged zucchini slices. Then, sprinkle with additional salt and freshly ground black pepper to taste. You can also add a few extra fresh rosemary sprigs for enhanced aroma.
-
Prepare the egg wash: In a small bowl, whisk together the egg yolk and 1 teaspoon of water until well combined. Using a pastry brush, lightly brush this egg wash over the exposed folded edges of the galette crust. This step will give your crust a beautiful golden sheen and crispy texture.1 egg yolk plus 1 teaspoon water for an egg wash
-
Carefully transfer the baking sheet with the assembled galette to your preheated oven. Bake for 30-40 minutes, or until the galette crust is beautifully golden brown and the zucchini is tender and slightly caramelized. The exact baking time may vary slightly depending on your oven, so keep an eye on it!
-
Once baked, remove the galette from the oven and let it cool on the baking sheet for a few minutes before slicing. This allows the filling to set and makes for cleaner cuts. Cut into wedges and serve warm or at room temperature. For an extra touch, consider garnishing with a sprinkle of fresh lemon zest, more chopped rosemary, or a final grating of cheese. Enjoy your homemade, rustic Zucchini and Ricotta Galette!
Notes
- The galette dough is ideal for making ahead! To freeze, prepare the dough as instructed up until the point you would refrigerate it. Wrap the disk very well with several layers of plastic wrap to prevent freezer burn, then place it in a heavy-duty freezer-safe bag. It can be stored in the freezer for up to 3 months. Thaw overnight in the refrigerator or for about an hour at room temperature before rolling out and assembling. This strategy significantly streamlines the baking process on busy days.
Nutrition*
*Nutrition information is provided as a courtesy and is an estimate only. Nutrition information can vary depending on many factors, such as products used, measurements and substitutions, therefore it is recommended that you obtain nutritional calculations based on your own finished recipe.
